Creating a Dean's List Report in Navigate for Departments
With grades now posted in RamPortal, you can use Navigate to generate reports identifying students who have qualified for the Dean's List (minimum 12 credits, Term GPA ≥ 3.67).
Before You Begin
- Update Your User Settings: Ensure your Navigate User Settings reflect the correct semester. Navigate defaults to the current term based on the academic calendar. If this setting is not updated, the Term GPA column may appear blank.
- Classification Considerations: Unless specific classifications are selected, reports will include both undergraduate and graduate students.
- Graduated Students: Navigate does not include data for prospective or graduated students.
Checking your User Settings:
- Log in to Navigate.
- Check your User Settings - click on your picture in the upper right corner. A dropdown menu will appear. Choose
User Settings.
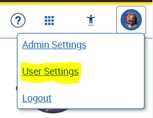
User Settings will Appear, Click on Default Term Setting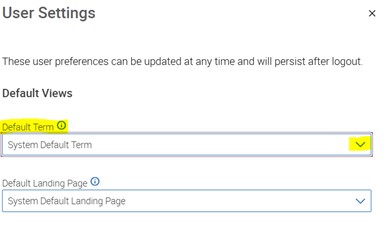
- Update your Settings: Click on the down arrow and scroll to the desired semester. Ex: Change default to
Fall 2024.
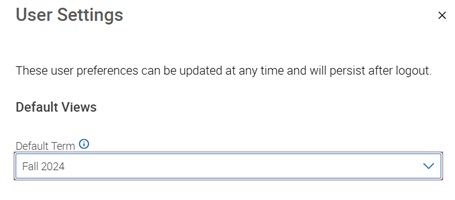
- SAVE the change!
Pulling the Report:
- Click on the Report Icon
 on the left navigation panel.
 - Go to the Standard Reports tab.
- Scroll down and select Students Report – this will open a new page.
Dean's List by Department
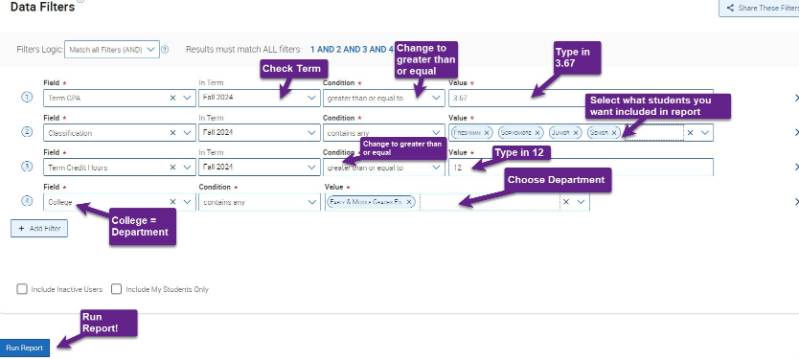
- In the "Field" type or scroll down to Term GPA.
- In Term: Ensure the correct semester is selected (e.g., Fall 2024).
- Condition: Defaults to contains any - change to greater than or equal to.
- Value: Enter 3.67.
- Click +Add Filter.
- In the Field: type or scroll down to Classification
- In Term: Ensure the correct semester is selected (e.g., Fall 2024).
- Condition: Defaults to Contains Any.
- Value: Select the classifications you want (e.g., Freshman, Sophomore, etc.).
- Click +Add Filter.
- In the Field: type or scroll down to Term Credit Hours
- In Term: Ensure the correct semester is selected (e.g., Fall 2024).
- Condition: Defaults to contains any - change to greater than or equal to.
- Value: Enter 12
- Click +Add Filter.
- Field: Type or scroll to College (this filter will allow you to pick departments)
- Condition: Defaults to Contains Any.
- Value: type or scroll down to the desired department(s).
- Review your filters and then click Run Report.
Saving and Managing Your Reports
Save Your Report
- Once you're satisfied with the results, click Save As

- Use a descriptive name that includes the values you used in your search for easy identification.
- Your report will be stored in the My Saved Reports section of Reporting

- To rerun the report later, click on its title and then click Run Report for updated results.
Manage Your Columns
If the report includes columns you don't need, use the Column Manager to hide them.
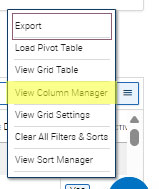
- Click the "hamburger button" at the end of the report (right side) and scroll to View Column Manager.
- A list on column headings will appear.
- Uncheck the heading(s) you want to remove from your report.
- Click on the "View Grid Settings" or "Run Report" again to see the changes.
- Oops - need to add in another data column! You can add in any deleted columns, by clicking on "View Column Manager" and check-off the columns you want to add to your report.
- Use the Save As button to update any changes.
Communicating with Students
Once you have a list of students, you can use the Actions Menu to communicate with them directly.
- Check the box next to specific students or use the Select All option at the top to include all students on the list.
- If your list contains more than 100 students, click the Select All option at the bottom to include everyone.
- Use the Actions Menu dropdown to choose your desired action, such as sending an email or exporting the list.
Let me know if you have any questions or need further clarification. Email navigate@wcupa.edu for technical assistance. Happy reporting!
